LinuxInstall-DecalPluginThwargle: Difference between revisions
Jump to navigation
Jump to search
No edit summary |
No edit summary |
||
| (2 intermediate revisions by the same user not shown) | |||
| Line 6: | Line 6: | ||
===Step 1=== | ===Step 1=== | ||
[[File:LinuxInstall- | [[File:LinuxInstall-Lutris1.png|left|thumb|600x600px|Open Lutris and select install from local yaml file, and navigate to Decal.yaml]] | ||
<div style="clear: both"></div> | <div style="clear: both"></div> | ||
===Step 2=== | ===Step 2=== | ||
[[File:LinuxInstall- | [[File:LinuxInstall-Addons1.png|left|thumb|600x600px|Click install]] | ||
<div style="clear: both"></div> | <div style="clear: both"></div> | ||
===Step 3=== | ===Step 3=== | ||
[[File:LinuxInstall- | [[File:LinuxInstall-Addons2.png|left|thumb|600x600px|Select the same install location as you picked for AC, then click install]] | ||
[[File:LinuxInstall- | |||
[[File:LinuxInstall- | <div style="clear: both"></div> | ||
[[File:LinuxInstall- | |||
[[File:LinuxInstall- | ===Step 4=== | ||
[[File:LinuxInstall-Addons9.png|left|thumb|543x543px|]] | [[File:LinuxInstall-Addons3.png|left|thumb|600x600px|Click continue]] | ||
[[File:LinuxInstall-Addons10.png|left|thumb|450x450px|]] | |||
[[File:LinuxInstall-Addons11.png|left|thumb|450x450px|]] | <div style="clear: both"></div> | ||
[[File:LinuxInstall-Addons12.png|left|thumb| | |||
[[File:LinuxInstall-Addons13.png|left|thumb| | ===Step 5=== | ||
[[File:LinuxInstall-Addons14.png|left|thumb|600x600px|]] | [[File:LinuxInstall-Addons4.png|left|thumb|600x600px|Click next]] | ||
[[File:LinuxInstall-Addons15.png|left|thumb|600x600px|]] | |||
[[File:LinuxInstall-Addons16.png|left|thumb|600x600px|]] | <div style="clear: both"></div> | ||
[[File:LinuxInstall-Addons17.png|left|thumb|600x600px|]] | |||
[[File:LinuxInstall-Addons18.png|left|thumb|600x600px|]] | ===Step 6=== | ||
[[File:LinuxInstall-Addons19.png|left|thumb|600x600px|]] | [[File:LinuxInstall-Addons5.png|left|thumb|600x600px|Click custom]] | ||
[[File:LinuxInstall-Addons20.png|left|thumb|626x626px|]] | |||
[[File:LinuxInstall-Addons21.png|left|thumb|600x600px|]] | <div style="clear: both"></div> | ||
[[File:LinuxInstall-Addons22.png|left|thumb|600x600px|]] | |||
[[File:LinuxInstall-Addons23.png|left|thumb|600x600px | ===Step 7=== | ||
[[File:LinuxInstall-Addons24.png|left|thumb|600x600px|]] | [[File:LinuxInstall-Addons6.png|left|thumb|600x600px|'''Note: Decal must be installed to C:\Games\Decal''' Set install path and click next, then click install]] | ||
[[File:LinuxInstall-Addons25.png|left|thumb|600x600px|]] | |||
[[File:LinuxInstall-Addons26.png|left|thumb|600x600px|]] | <div style="clear: both"></div> | ||
[[File:LinuxInstall-Addons27.png|left|thumb|600x600px|]] | |||
[[File:LinuxInstall-Addons28.png|left|thumb|600x600px|]] | ===Step 8=== | ||
[[File:LinuxInstall-Addons29.png|left|thumb|600x600px|]] | [[File:LinuxInstall-Addons8.png|left|thumb|600x600px|'''Note: You must click finish before selecting the AC install dir.''' Click finish]] | ||
<div style="clear: both"></div> | |||
===Step 9=== | |||
[[File:LinuxInstall-Addons9.png|left|thumb|543x543px|Set your install to C:\Games\AC and click okay.]] | |||
<div style="clear: both"></div> | |||
===Step 10=== | |||
[[File:LinuxInstall-Addons10.png|left|thumb|450x450px|Click okay and and exit decal using the decal tray icon. If you don’t lutris will not finish the install for decal. '''Note: Do not try to update the decal .dlls until after Lutris has completed the install. If you do it will corrupt decal and you will have to start over.''']] | |||
<div style="clear: both"></div> | |||
===Step 11=== | |||
[[File:LinuxInstall-Addons11.png|left|thumb|450x450px|Once Lutris have completed the decal install script you can then launch Decal and update the .dlls]] | |||
<div style="clear: both"></div> | |||
===Step 12=== | |||
[[File:LinuxInstall-Addons12.png|left|thumb|600x600px|Click update, then click ok.]] | |||
<div style="clear: both"></div> | |||
===Step 13=== | |||
[[File:LinuxInstall-Addons13.png|left|thumb|600x600px|All components should have a black check except “Plugin Surrogate”. Close the windows and close down decal.]] | |||
<div style="clear: both"></div> | |||
==Plugin Install== | |||
===Step 1=== | |||
[[File:LinuxInstall-Addons14.png|left|thumb|600x600px|'''Note: Decal must be completely closed before you install the plugins.''' Select the Plugins.yaml script using the “run local yaml file” in Lutris. Then click install]] | |||
<div style="clear: both"></div> | |||
===Step 2=== | |||
[[File:LinuxInstall-Addons15.png|left|thumb|600x600px|Install to the same path as AC and Decal. You can ignore the warning about existing files.]] | |||
<div style="clear: both"></div> | |||
===Step 3=== | |||
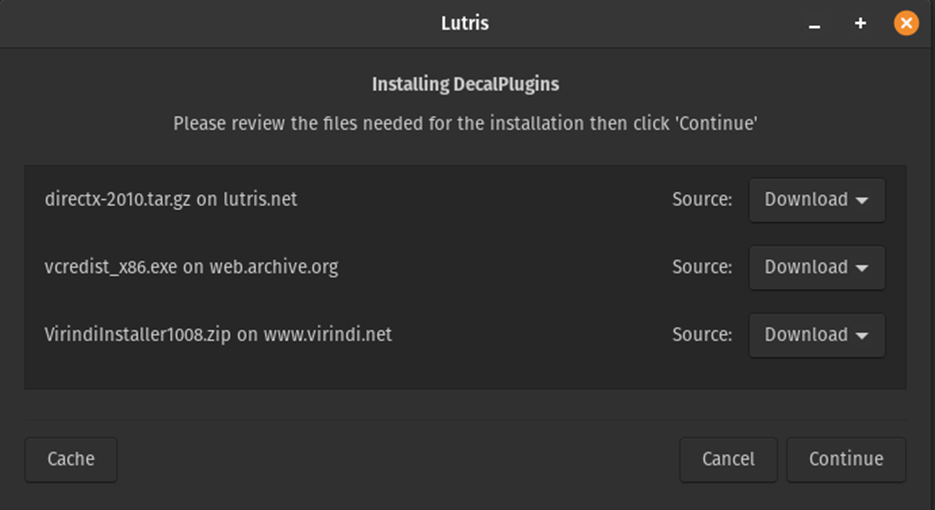
[[File:LinuxInstall-Addons16.png|left|thumb|600x600px|'''Note: There is a number of things to install and in some places it may seem frozen. Be patient and check the error log if you have concerns, but it has always finished during testing as long as Decal has been closed.''' The installer will attempt to download everything needed to complete the process. Click continue.]] | |||
<div style="clear: both"></div> | |||
===Step 4=== | |||
[[File:LinuxInstall-Addons17.png|left|thumb|600x600px|There will be a number of popups as the system installs the needed components, but eventually the Virindi plugin installer will load. Check libs(everything should be loaded), then click install.]] | |||
<div style="clear: both"></div> | |||
===Step 5=== | |||
[[File:LinuxInstall-Addons18.png|left|thumb|600x600px|Set the install path to VirindiPlugins (if not selected automatically) and click Okay.]] | |||
<div style="clear: both"></div> | |||
===Step 6=== | |||
[[File:LinuxInstall-Addons19.png|left|thumb|600x600px|Monitor the install window until it says you may close the window. Do so, then close the Lutris install window.]] | |||
<div style="clear: both"></div> | |||
===Step 7=== | |||
[[File:LinuxInstall-Addons20.png|left|thumb|626x626px|Before moving on to Thwargle, open Decal to verify the plugins are working correctly. If so exit decal completely and continue.]] | |||
<div style="clear: both"></div> | |||
==Thwargle Install== | |||
''Note: There is an error when installing DotNet 452 that causes it to crash. Simply run the installer a second time and it will complete.'' | |||
===Step 1=== | |||
[[File:LinuxInstall-Addons21.png|left|thumb|600x600px|Open Lutris and select install from local yaml, navigate to Thwarg.yaml, and click install]] | |||
<div style="clear: both"></div> | |||
===Step 2=== | |||
[[File:LinuxInstall-Addons22.png|left|thumb|600x600px|Select the same install folder as the rest and click install. The script will attempt to download the needed files.]] | |||
<div style="clear: both"></div> | |||
===Step 3=== | |||
[[File:LinuxInstall-Addons23.png|left|thumb|600x600px]] | |||
<div style="clear: both"></div> | |||
===Step 4=== | |||
[[File:LinuxInstall-Addons24.png|left|thumb|600x600px|After installing the required fonts, Thwargle installer should start. Click next]] | |||
<div style="clear: both"></div> | |||
===Step 5=== | |||
[[File:LinuxInstall-Addons25.png|left|thumb|600x600px|Set the install to C:\Games\Thwargle and click next]] | |||
<div style="clear: both"></div> | |||
===Step 6=== | |||
[[File:LinuxInstall-Addons26.png|left|thumb|600x600px|Accept the terms and click next.]] | |||
<div style="clear: both"></div> | |||
===Step 7=== | |||
[[File:LinuxInstall-Addons27.png|left|thumb|600x600px|Click install]] | |||
<div style="clear: both"></div> | |||
===Step 8=== | |||
[[File:LinuxInstall-Addons28.png|left|thumb|600x600px|Do not check “Launch now”. Click finish.]] | |||
<div style="clear: both"></div> | |||
===Step 9=== | |||
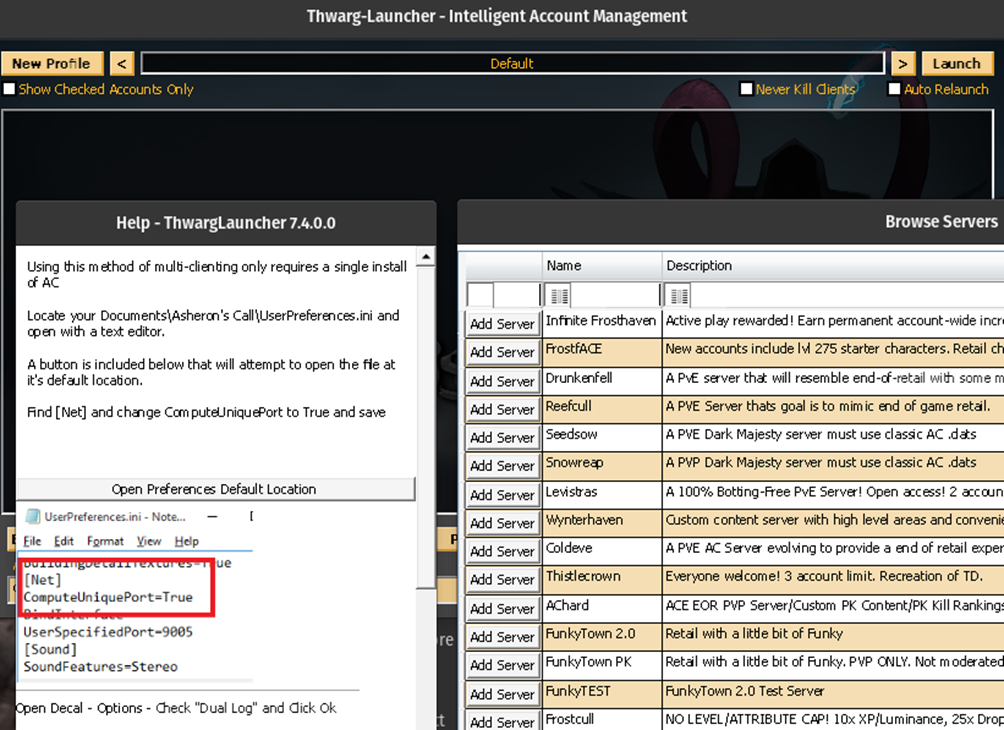
[[File:LinuxInstall-Addons29.png|left|thumb|600x600px|Close out the Lutris script runner, then configure Thwargle launcher as you normally would and play. There are clearly some minor bugs still and intend to see them through, but life happens so you never know. Thanks to all who continue to support and develop all the things that make AC sill playable.]] | |||
Latest revision as of 19:54, 12 October 2025
Decal, Plugins, and Thwargle Launcher Install Instructions
Pay special attention to install locations or the scripts may fail!
Decal Install
Step 1

Step 2

Step 3

Step 4

Step 5

Step 6

Step 7

Step 8

Step 9

Step 10

Step 11

Step 12

Step 13

Plugin Install
Step 1

Step 2

Step 3

Note: There is a number of things to install and in some places it may seem frozen. Be patient and check the error log if you have concerns, but it has always finished during testing as long as Decal has been closed. The installer will attempt to download everything needed to complete the process. Click continue.
Step 4

Step 5

Step 6

Step 7

Thwargle Install
Note: There is an error when installing DotNet 452 that causes it to crash. Simply run the installer a second time and it will complete.
Step 1

Step 2

Step 3

Step 4

Step 5

Step 6

Step 7

Step 8

Step 9

Close out the Lutris script runner, then configure Thwargle launcher as you normally would and play. There are clearly some minor bugs still and intend to see them through, but life happens so you never know. Thanks to all who continue to support and develop all the things that make AC sill playable.